Setting up an Epson Printer
Setting up an Epson printer has never been easier just follow the guide step-by-step and you'll have your brand new printer setup in no time.
Initial Printer Setup
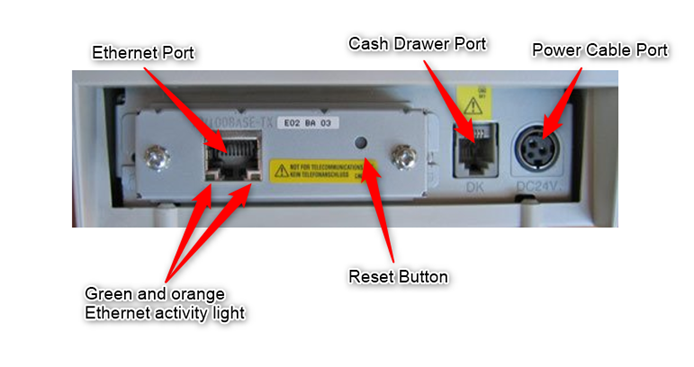
The first step is a simple as it sounds, plug the printer into a power source then recognise if you've ordered a Bluetooth or Ethernet printer.
If the printer connects via Ethernet, plug in the cable at the back ensuring both the green and orange lights are flashing.
If your printer connects via Bluetooth, simply turn on your Bluetooth in the iPad setting and connect to the printer.
Add the Printer to your Back Office
Perform a feed test, this is done by turning off the printer using the power switch, Holding down the feed button and powering the printer back on. You will need to keep hold of the feed button until a receipt is printed. Once printed, take the receipt to your computer with your back office and note the MAC ADDRESS. This is key to the setup and is a physical, singular address tied only to this printer.
Head to:
Configuration > Printing > Printers
Once you're here, locate and select the printer you'd like to replace. Take your MAC ADDRESS noted from the feed test receipt and input this, replacing the old MAC ADDRESS. Just for clarity, MAC ADDRESSES look something like this: 50:57:9C:CD:CE:86. The receipt may show a - instead of a : so please ensure these are entered using the ":".
Alternatively, if you're adding an entirely new printer, just input this under the "Add printer" button using the RPT/KPT acronym just so we can try and keep things similar.
Next would be to simply select your printer from the drop-down list. If you're unsure which printer you have, just check your invoice.
Now you've added your printer head to the next tab under printer: PRINTING PROFILES. If you're unsure, a printing profile includes the settings that control whether a printer will print copies of receipts or production tickets, or whether another printer should be used as a backup printer. Name this with a similar name, using a sequential number such as "PP-RECEIPT3" or, just as before, add a brand new printer profile giving this a name and select the printer you added earlier.
One extra step you'll have to do as this point ONLY if you are adding a KITCHEN/BAR/DOCKET printer; select PRODUCTION CENTERS under the printing tab and, again, add the new printer (you shouldn't need to do this if you've replaced an old printer and complete the previous steps).
*If you have replaced a printer skip this step*
The very final step is associating the printers with what you would like to print there. For receipt printers, head to Devices > Devices and select the printer profile. For kitchen/bar/docket printers, select this under Items > Accounting Groups then individually pair the accounting groups with the production centers.
Reload all of your tills and test them all via the Lightspeed app heading through to Settings > Printing centers.
Receive Buffer for Kitchen and Bar Printers
This can be a really useful addition to the printer for extremely busy periods. The setting will ensure if two orders are sent at the same time, one will push through and usual and any others will load up behind the first and be pushed out
First step:
Perform another feed test on the printer.
After doing a feed test clicks the ‘Feed’ button again. You will get the below options to choose from.
You will need to go ‘Customize Value Settings’.
Click the ‘Feed button’ 3 times, then to save this click the ‘Feed’ button 1 more time.

Second step:
For the next step, you will need to go to ‘Interface Settings’
Click the ‘Feed’ button 2 times, then to save this click the ‘Feed’ button once.

Third step:
In this step, you will need to go to ‘BUSY Condition’.
Click the ‘Feed’ button 9 times, followed by one more click on the ‘Feed’ button to save this.

Last step:
In the last step, you will need to go to ‘Receive buffer full’. To do this click the ‘Feed’ button 2 times followed by one more time to ensure the changes have been saved.

If you have an issue with any of these steps, please don't hesitate to contact our support team.
Comments
0 comments
Please sign in to leave a comment.