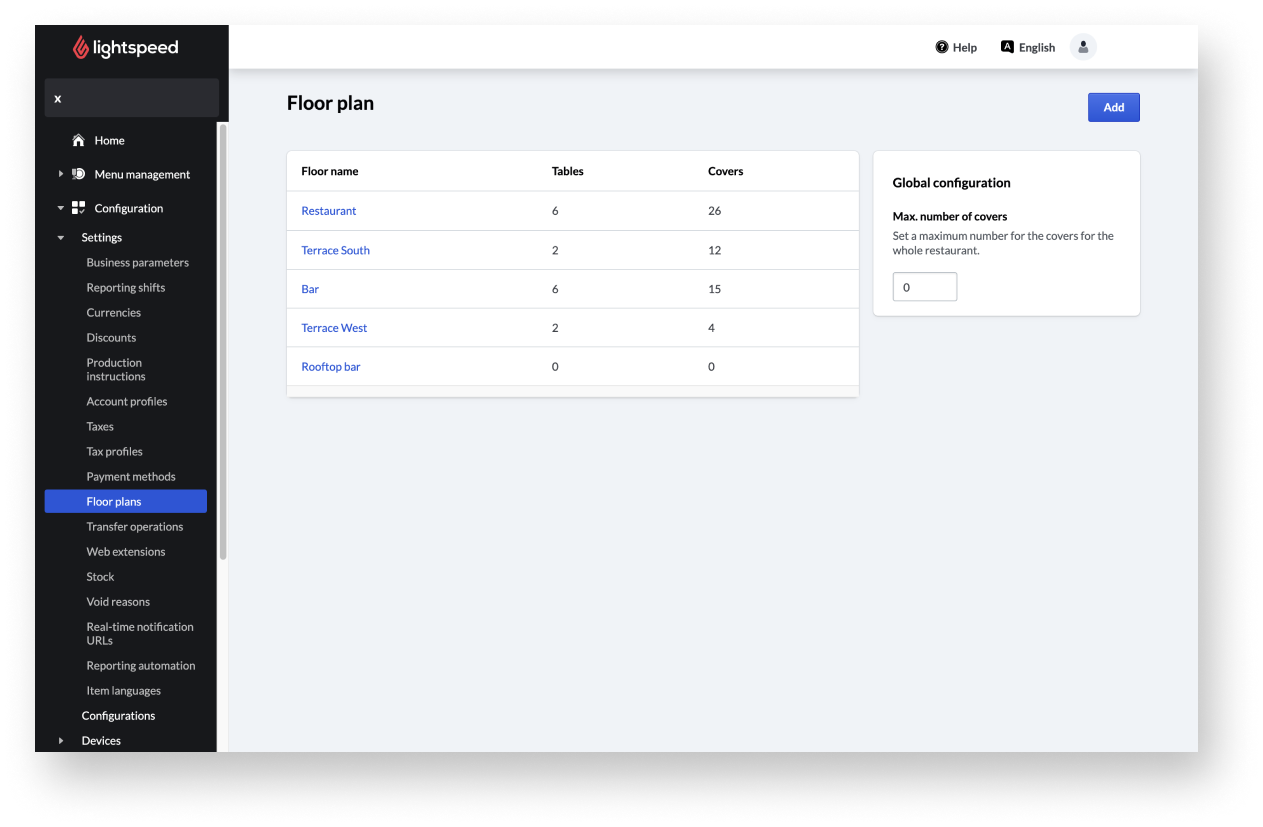
Floor plans in Lightspeed Restaurant allow you to reflect the layout of a location (table environments) or organize tables into different groups for ease of use (e.g., quick-service restaurant with Takeaway and Dine-In groups). Floor plans are essential for businesses with table service as they are used for orders and billing as well as seating.
Add, edit, and manage a floor plan with tables from the Back Office. Set a number of seats for each table in the Back Office to split checks by seat on the POS.
Adding floor plans and tables
Floor plans can be used to reflect the layout of your restaurant or to organize tables into different environments for ease of use (e.g., quick-service restaurant with Takeaway and Dine-In groups).
Floor plans are essential for businesses with table service as they are used for orders and billing as well as seating. Set a number of seats for each table in the Back Office to split checks by seat on the POS.
Adding floor plans
Add floor plans with single or multiple tables with the same settings for all tables per floor plan. If there are several floor plans, they must have different names.
- Log in to the Back Office with your Lightspeed Restaurant credentials.
- From the main navigation menu, select Configuration > Settings > Floor plans.
- Click Add.
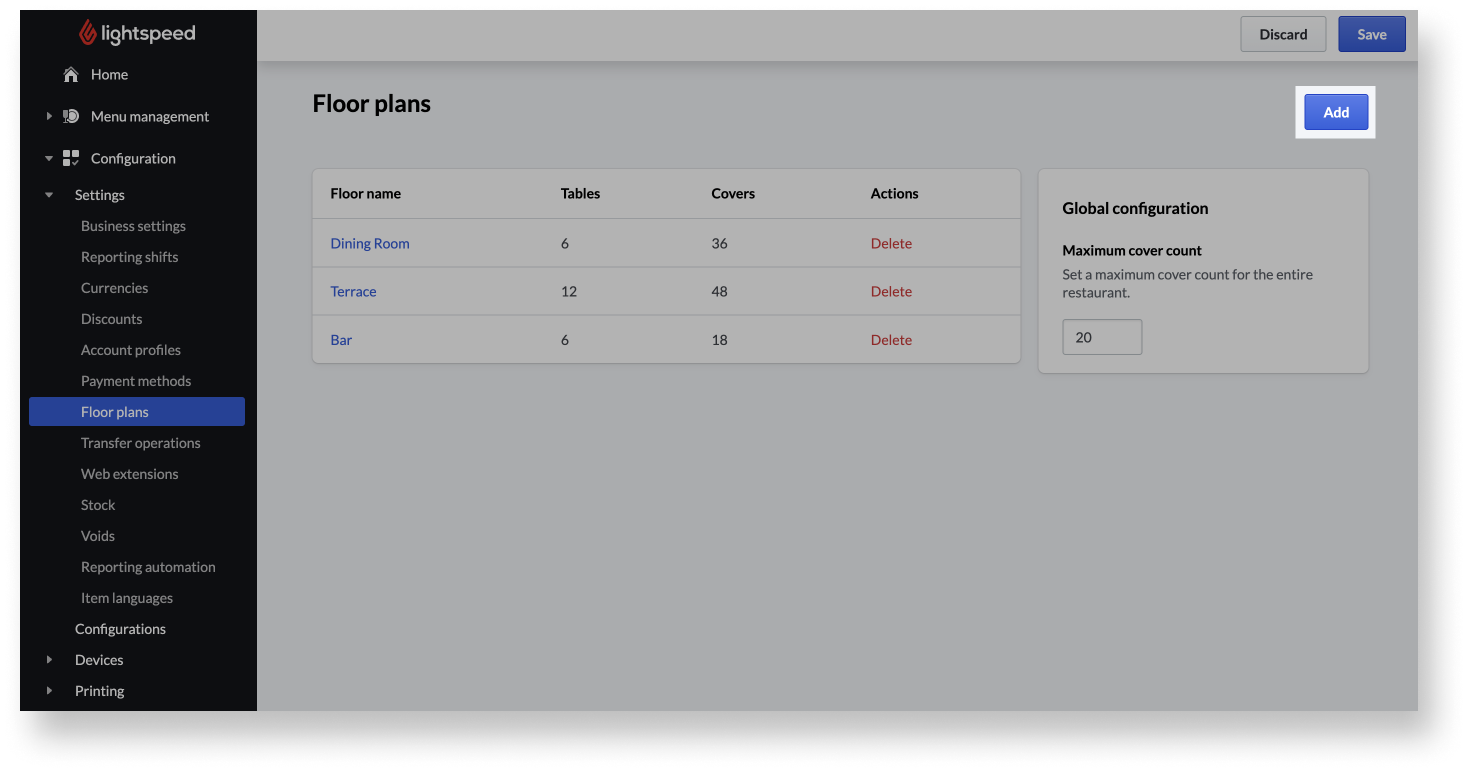
- Enter the floor plan’s name. The name must be unique across all floor plans.
- Click Add to create the new floor plan.
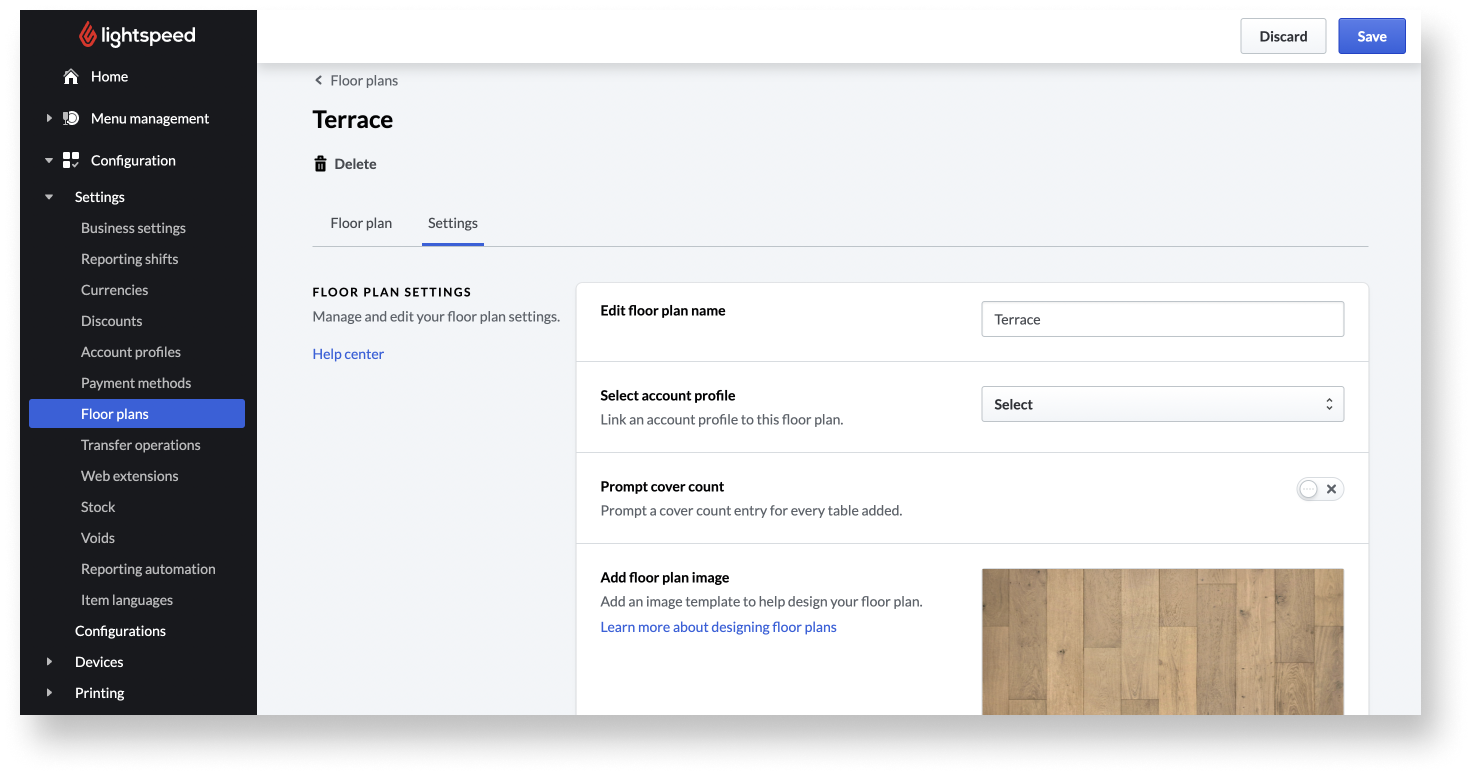
- Click the Settings tab and enter the floor plan and printer settings.
- Click Save to save your changes.
- If you want to add tables to the floor plan, following the instructions in the Adding tables section.
- On the POS, navigate to Settings > Control center and click Reload to make your changes visible.
Floor plan and printer settings
| Setting name | Description |
| Floor plan settings | |
|
Edit floor plan name |
The floor plan’s name as displayed in the Back Office and on the POS. |
|
Select account profile |
By assigning an account profile to a table, all orders taken from the table adopt the settings from the account profile. All account profiles created in Configuration > Settings > Account profiles are available. |
|
Prompt cover count |
When activated, the POS user will be asked to enter the number of occupied seats for every table opened on the POS. |
|
Add floor plan image |
Upload a background image to appear on the POS. Drag and drop an image or click Browse files and choose an image from your device. The image must either be a JPG or PNG image less than 2MB in size. If the dimensions exceed 900 x 480 pixels, it will be rescaled to fit. |
|
Printer settings |
|
|
Select receipts profile |
Receipts created for tables in the floor plan will be printed on the printers with the selected printer profile. All printing profiles created in Configuration > Printing > Printing profiles are available. |
|
Select notes profile |
Notes created on tables in the floor plan will be printed on the printers with the selected printer profile. All printing profiles created in Configuration > Printing > Printing profiles are available. |
Adding tables
Create and manage orders on the POS with tables. Set a number of seats for each table in the Back Office to split checks by seat on the POS. It’s important that the table number is only assigned once across all floor plans.
Continue with step 4 immediately after adding a floor plan. To access the tables page at a later time, see steps 1-3.
- Log in to the Back Office with your Lightspeed Restaurant credentials.
- From the main navigation menu, select Configuration > Settings > Floor plans.
- Click the floor name to add tables.
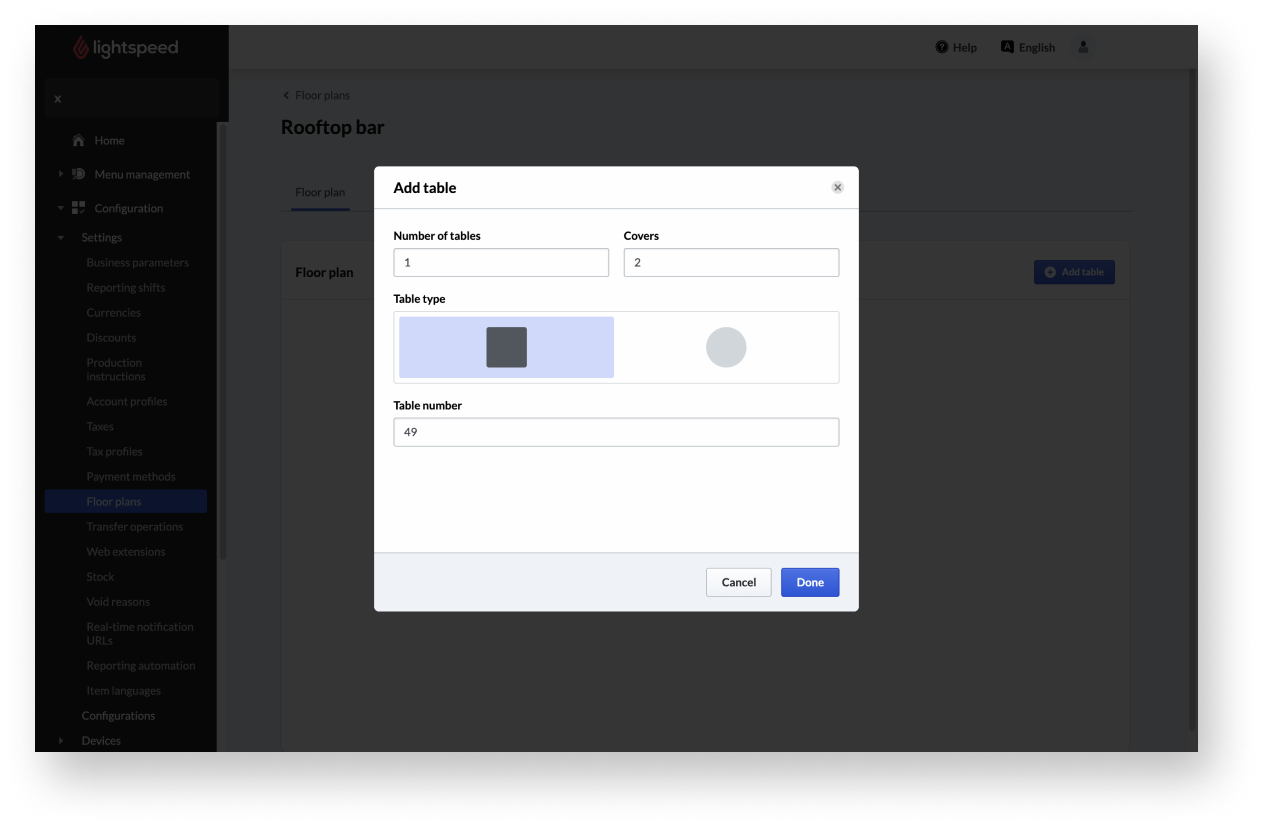
- Click Add table and enter the table settings to add a table to the floor plan.
- Position the table on the floor by dragging and dropping
- Click the table and scale the table by pulling and pushing the table edge.
- Click Save to save changes.
- On the POS, click Reload in Settings > Control center to make the changes visible.
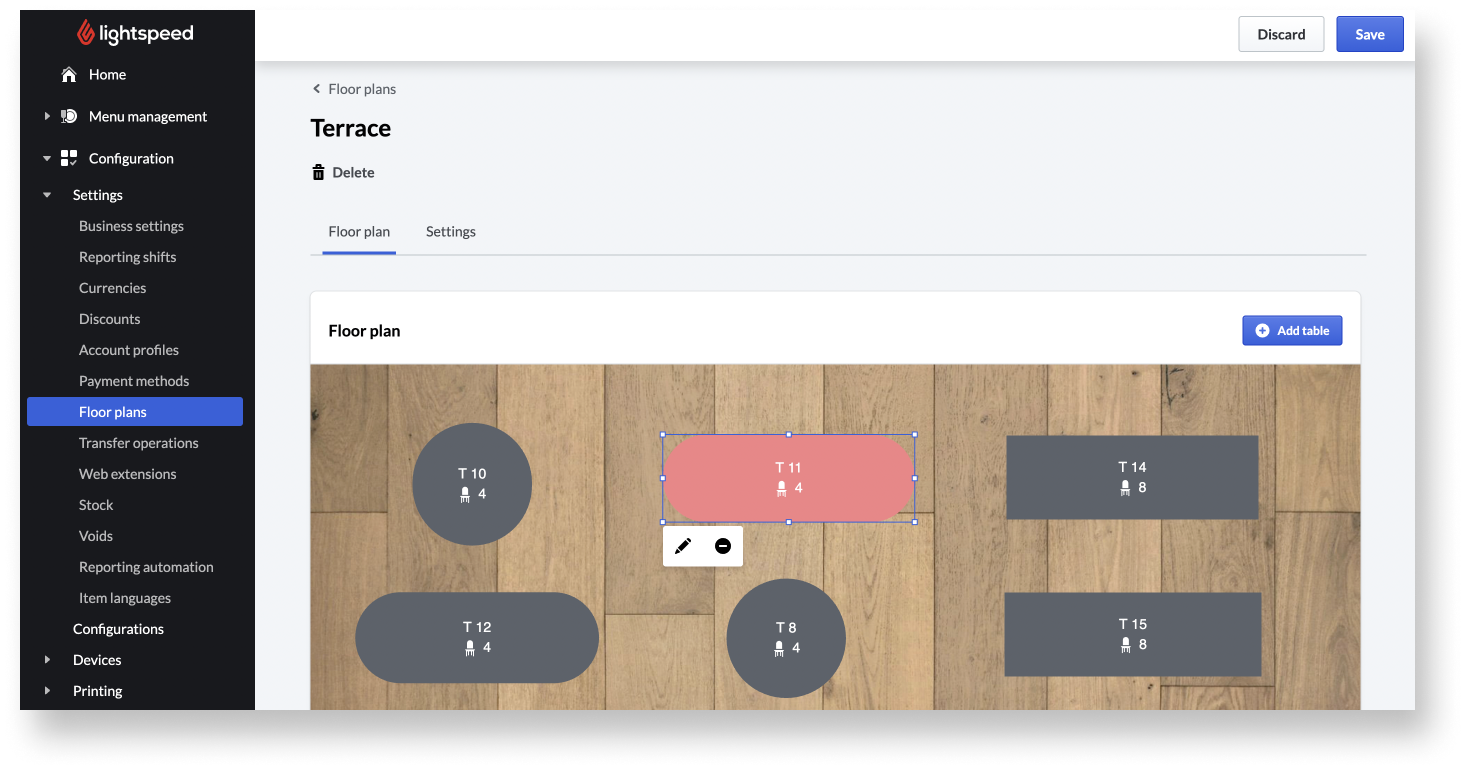
Table settings
| Setting name | Description |
|
Number of tables |
The number of tables that will be added to the floor plan. The maximum number of tables per floor plan is 150. |
|
Covers |
The number of seats per table. This is important for splitting checks by seat on the POS and reporting (Staff Turnoverreport in Back Office and ø average covers on POS). |
|
Table type |
The table shape (round or square). |
|
Table number |
Unique table number for each created table. |
Editing floor plans
Edit floor plans to modify the floor plan name, account profile, cover count entry, image, and printing profiles.
- Log in to the Back Office with your Lightspeed Restaurant credentials.
- From the navigation menu, select Configuration > Settings > Floor plans.
- Click the Floor name of the floor plan you want to change. If you want to delete a floor plan, click Delete.
- Select the Settings tab to edit floor plan and printer settings.
- Click Save to save your changes.
- If you need to modify tables, follow the instructions in the Editing tables section.
- On the POS, navigate to Settings > Control center and tap Reload to make your changes visible.
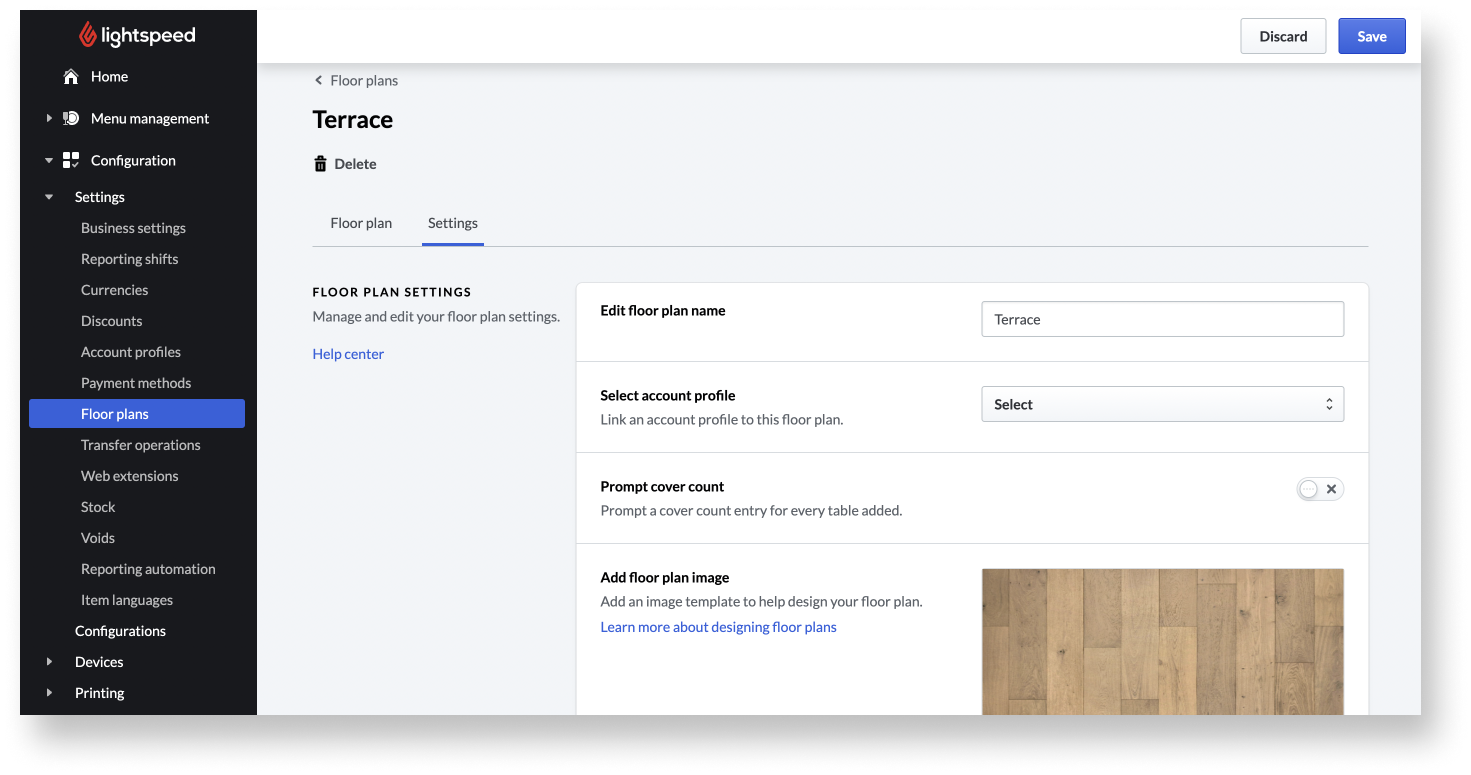
Editing tables
Edit tables to modify the table position, number, size, and number of seats, or to hide tables from floor plans.
Continue with step 4 immediately after editing a floor plan. To access the tables page at a later time, see steps 1-3.
- Log in to the Back Office with your Lightspeed Restaurant credentials.
- From the navigation menu, select Configuration > Settings > Floor plans.
- Click the Floor name of the floor plan you want to edit.
- Click a table to display and change table editing settings.
- To move the table’s position, drag and drop it.
- Click Save to save your changes.
- On the POS, navigate to Settings > Control center and click Reload to make your changes visible.
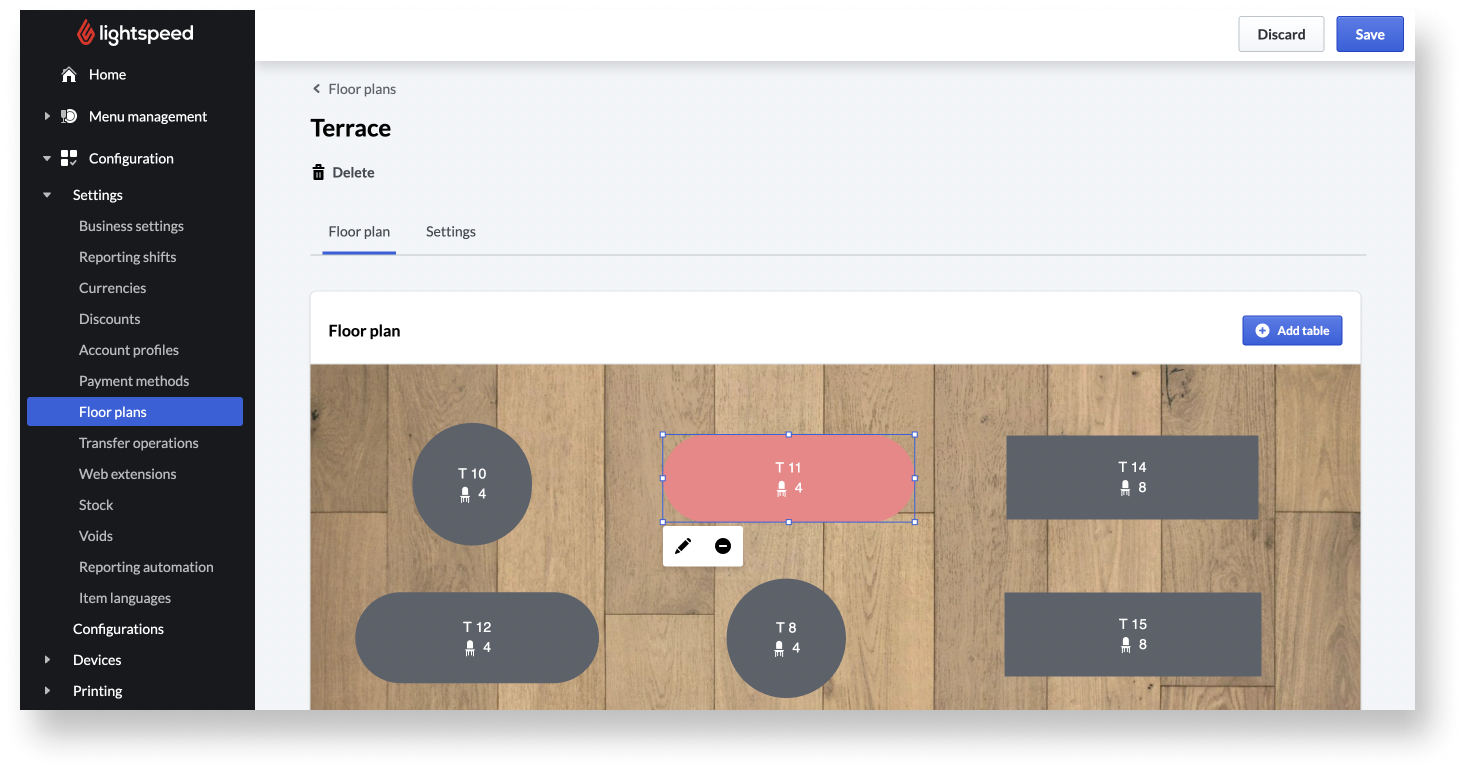
Table editing settings
| Setting name | Description |
|
Edit table size |
Scale the table by dragging or constricting the table edge. |
|
Edit symbol |
Click the pencil to open the Edit table section and change the seat amount, table shape, and table number.
|
|
Disable/enable symbol |
Click the disable symbol to deactivate tables and hide them from the floor plan on the POS. To make tables visible again, click the enable symbol (checkmark). Reporting is still available on hidden tables. To delete a floor plan, click the trash can icon located beneath the floor plan name. |
Comments
0 comments
Please sign in to leave a comment.