The POS devices page shows a list of devices connected to the K Series app. This page provides useful information about each device at a glance, such as its name, activity, and POS configuration. To access the POS devices page, log in to the Back Office with your Lightspeed credentials. Select Configuration>Devices>Devices from the main navigation bar.
For a POS device to appear on your Back Office, you’ll need to have logged in to the POS (K) app with that device using a connection code.
Once you have connected your devices to the POS (K) app, we recommend creating POS configuration. A POS configuration represents a series of settings representative of your business that can be applied to POS devices. This helps ensure your POS devices are using the app configuration that you have determined for your business.
Overview of POS device configuration page
On the POS device configuration page, you will view a table representative of your connected POS devices. From this page, you can edit, audit, or disable the POS device. The following table provides a summary of the information on the POS device configuration page:
| Column | Definition |
|
Device |
Name of the device. Note: There are two kinds of devices in the table: "Active" and "Passive." Financial transactions are handled by Active Devices. Active Devices will also keep any open orders to be processed on the next day if they weren’t closed by staff. An Active Device is marked with a star and is also the host of all other devices. Passive Devices can be understood as auxiliary POS devices, and so they have less functionality than your principal active device. Passive devices can be accessed only if an Active Device is also functioning and if all devices are connected to the same network. |
|
Active |
Indicates whether a device is set as an active device or not. |
| Last activity | When the device was last used. |
| Device state | "Connected" indicates that the app is currently running, while the state "Disconnected" indicates that the POS app is closed on the device. |
| Configuration status |
There are three potential statuses:
You can reload your POS device configuration in two ways:
|
| Configuration |
This column represents the configuration type used by the device. Note: A device configuration includes a grouping of settings applied to a POS device. These settings can be found from the Configuration>Configurations page, or you select the configuration name from this page to redirect to the Configurations page. Here you can edit or remove existing configurations. |
| Last configuration status | Date and time of last device configuration upload. |
| Application version |
Displays the currently installed application version. |
| Device name | The device’s name as it appears on your device’s iOS settings. |
| Device type | Based on the device type of use at your site, such as a point-of-sale (POS). |
| Actions | There are a few actions you can select from this page: Edit: The edit window of the device opens Audit: Shows journal for device Disable: Deletes device |
Detailed device information
If you have set up your own network at your location, this information could be useful while troubleshooting with our support.
- From the main navigation bar of the Back Office, go to Configuration > Devices > Devices
- Select the+ sign next to the device name to expand a section of technical data:
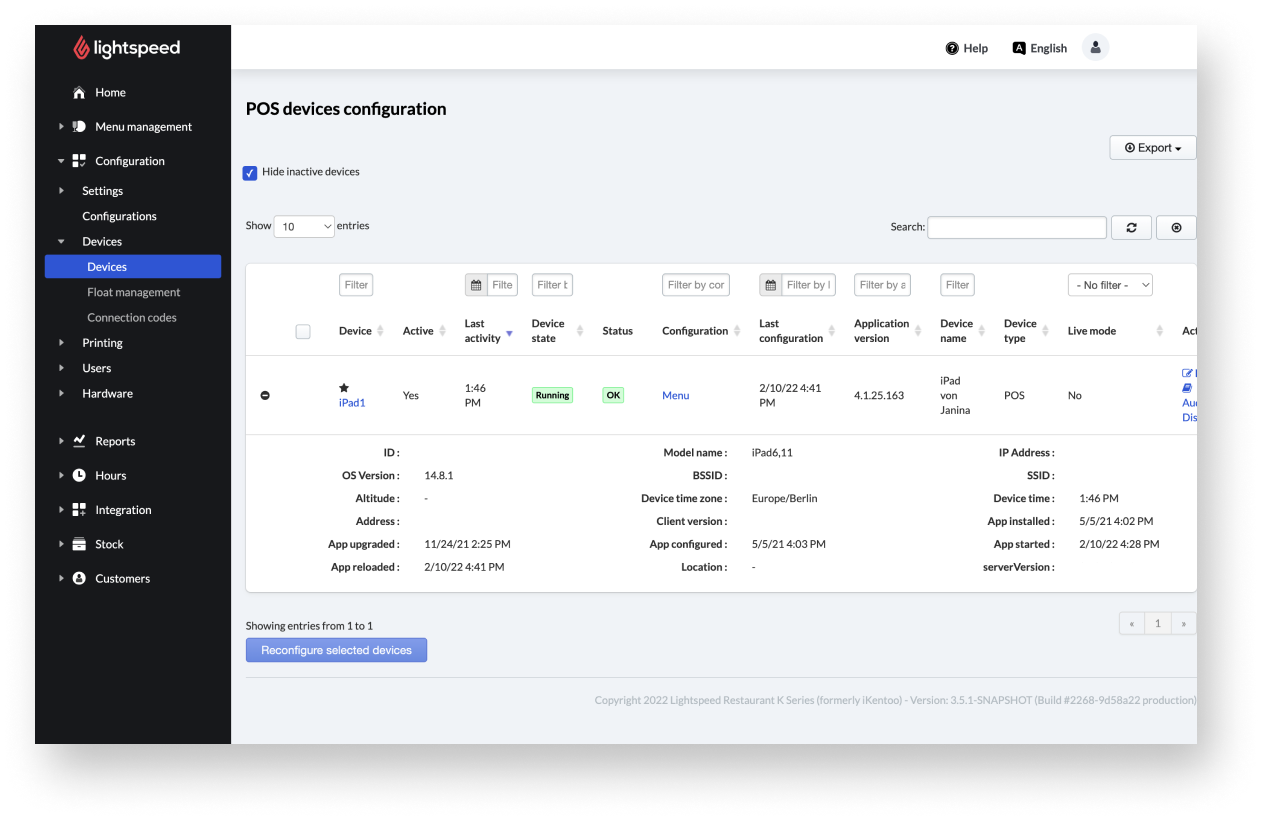
| ID | Indicates the device ID. |
| OS version | Shows the current version of the operating system. |
| Altitude | Displays the current height in meters at the position of the device. |
| App upgraded | Shows the last time the app was upgraded via the Apple App Store. |
| App reloaded | Indicates the last time the app was updated via the Back Office. |
| Model name: | This is the iPad model type. |
| BSSID: | That is the MAC address fetched from the wireless access point (the router's antenna). |
| Device time zone | Indicates the time zone synced with the iPad settings. Your iPad and Back-Office must be in the same time zone. |
| Client version: | 1.234.567.8 |
| App configured | Displays the date of app installation. |
| Location | Displays the GPS data of the device. |
| IP address and SSID | Show network information. If you have a Lightspeed network, you’ll have an SSID based on your Business location number such as: ikentoo-125610613538818 and a specific IP range. |
| Device time: | The set time on the device. |
| App installed and started | When the app was last installed and updated on the device. |
| serverVersion: | 1.234.567.8 |
Exporting devices
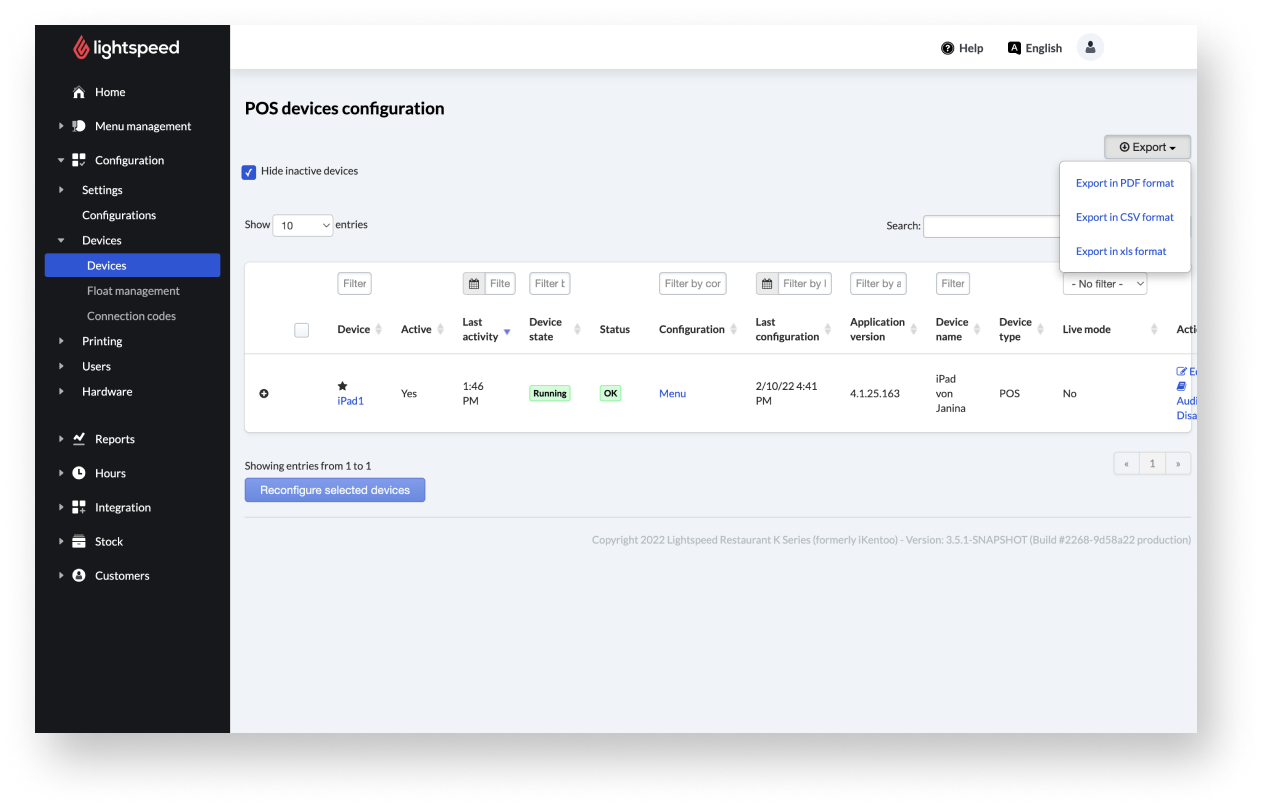
In the event that you ever need to transfer device data, you can export a table from the POS devices configuration page:
- Select the Export button in the upper right corner of the page.
- Choose an export format from the drop-down menu.
- After exporting, the file can be found in your computer's downloads folder.
If you ever need to edit the POS device information, you can easily do so from the Back Office. After selecting a device name from the POS device configurations page, you will be brought to that specific device’s settings page. From here, you can modify and select the settings you wish to be applied to this POS device.
If you ever need to edit the settings of a POS device, you’ll need to adjust the POS configuration instead.
Editing POS device settings from the Back Office:
- From the main navigation menu of the Back Office, go to Configuration>Devices>Devices.
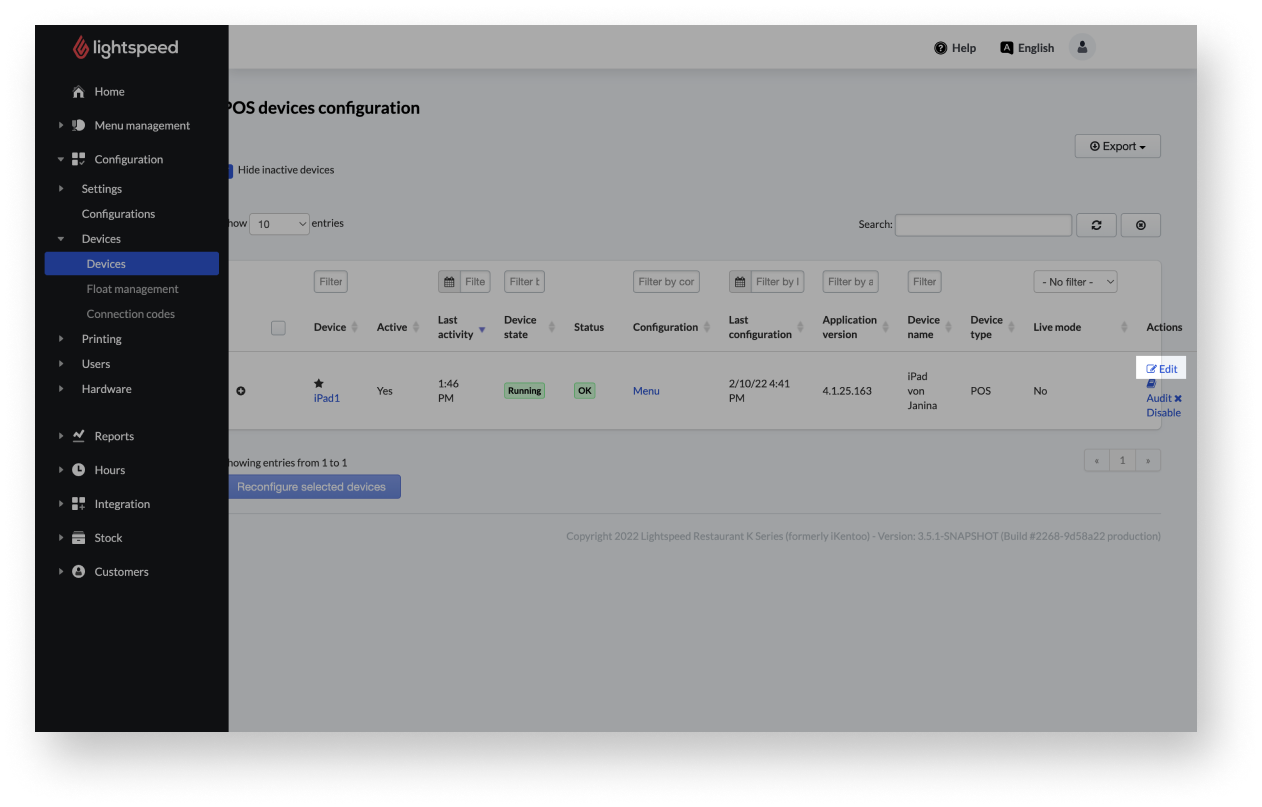
- To access the editing page you can either select Edit next to the desired device or directly select the appropriate device name.
- On the subsequent page, make your preferred changes to the device configuration. The following articles provide more information on what these settings mean.
- Select Save to apply the new settings.
Device information settings
From the device settings page, you can edit and configure settings for the POS device.
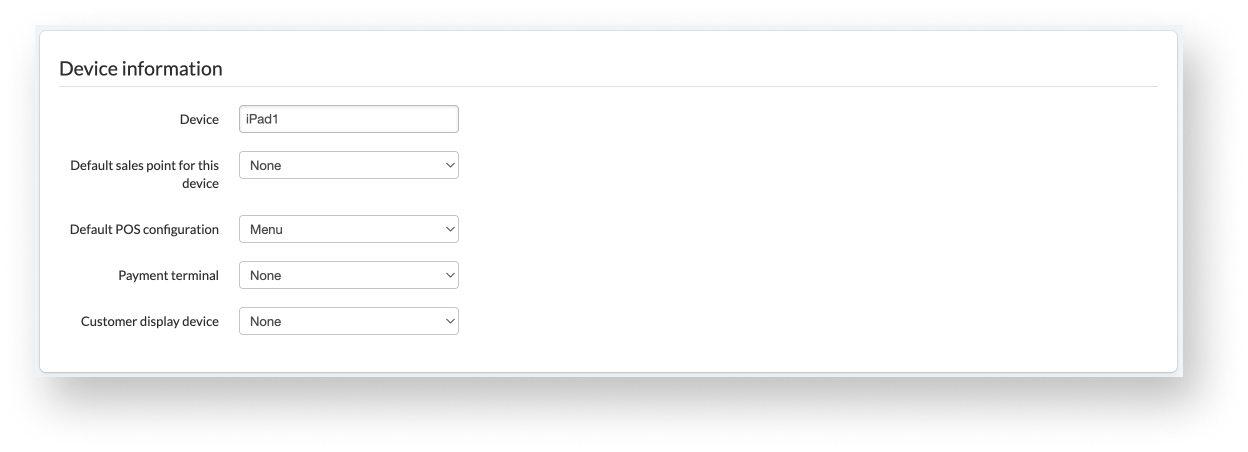
| Device | Shows the given device name. If you change it, make sure you stick to the 8-character limit, and remember it must be unique. |
| Default sales point for this device | Represents a designated floor plan for this device. Instead of setting it up here, we recommend you do it from the Configuration>Configurations page. |
| Default POS configuration |
Indicates the current POS configuration in use. Staff can also alter the settings directly on the iPad if they have appropriate permissions. |
| Payment terminal | Allows you to connect your device to a payment terminal. Note that you first must add a payment terminal to the Back Office. |
| Customer display device | Displays the device being used as a customer-facing display screen. |
Printing configuration settings
From the device settings page, you can also specify some printing settings for this particular POS device.
We recommend setting up printers and linking them to an account profile from the Configuration page. With that said, the following settings can be configured for your POS device for printing customer receipts or order tickets.
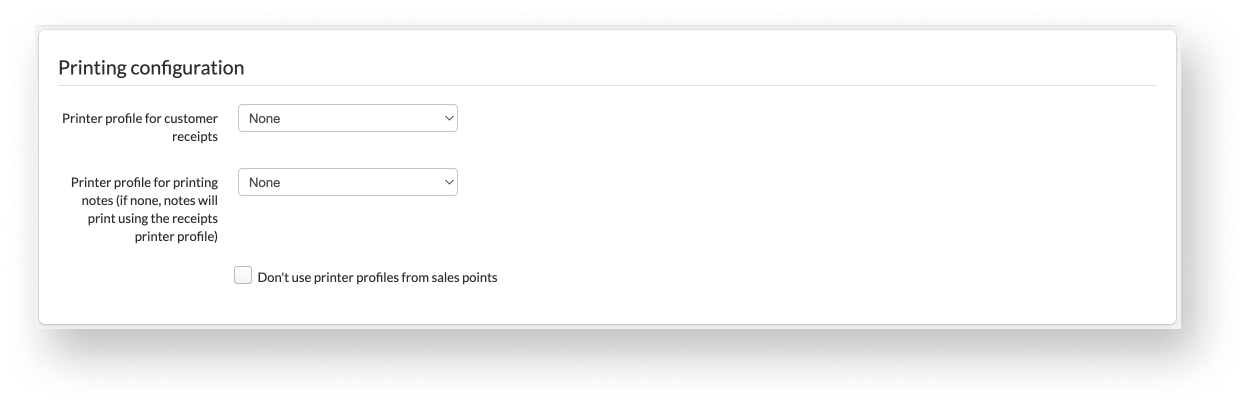
| Printer profile for customer receipts | Indicates when a printer is connected to a device, but we recommend linking printers to device configurations. |
| Printer profile for printing notes | Links a printer to print draft receipts or order ticket, but we recommend linking printers to device configurations. |
Account sharing settings
From the device settings page, you can also specify account sharing settings.
The Account Sharing Role allows you to specify whether a POS device should be an active or passive device. You can assign the following roles:
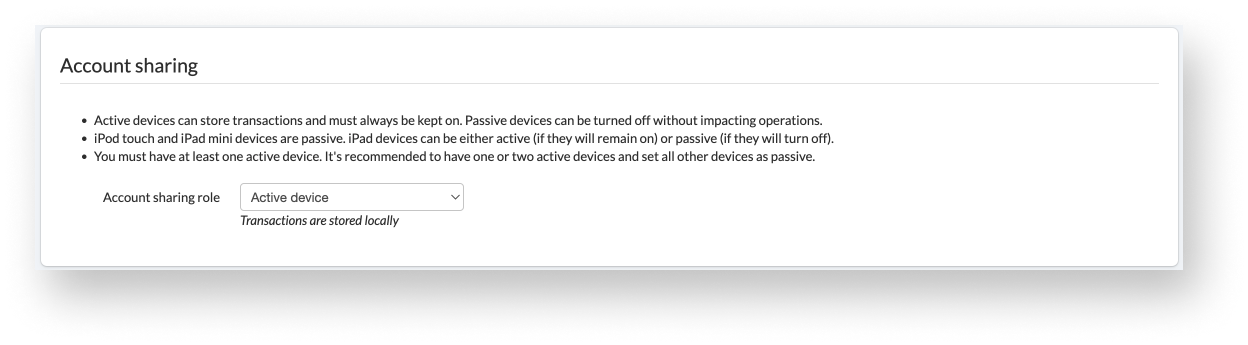
| Active Device | An active device is in charge of administering the data traffic between your Back Office and all POS devices at your site. |
| Passive Device |
Passive devices can be understood as secondary devices, like a remote – they do not store data and are used to communicate with the POS app. Passive devices can be turned off during a shift. If only one active device is listed, and you are switching this to passive, it will result in the loss of all open orders. |
| Preferred Active Device | Represents the main host, if you use multiple Active Devices. Data will be transferred to this active device first, and if the system cannot administer the request, data will be redirected to another active device. |
| Forced Active Device | If selected, this is the only active device to exchange data with the Back Office. |
If you switch a device from active to passive, it is only applied on the next business day. But if you switch a device from passive to active, the change is immediate.
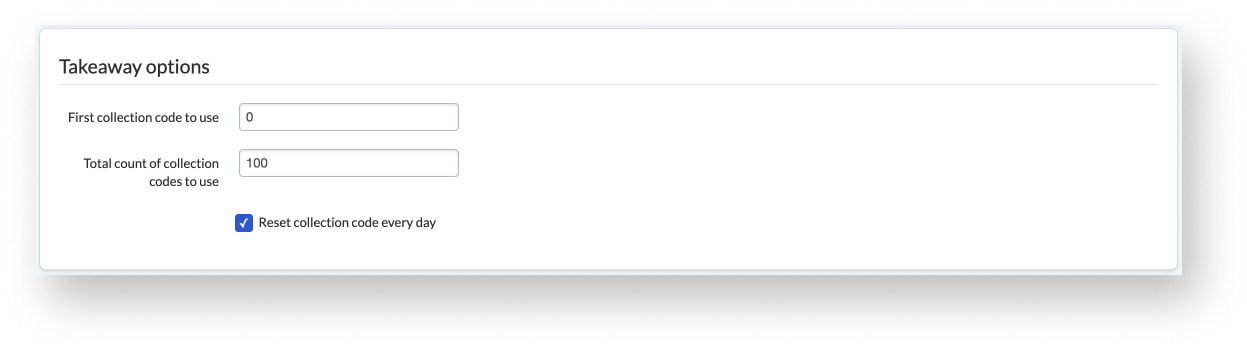
Takeaway option settings
From the device settings page, you can configure pickup number count.
Collection codes are linked to the account profile “Takeaway” and allow you to print a unique number on the receipt. This number can be used to identify the order for the customer.
You can reset the pickup number count every day, or you can wait until it reaches the limit and goes back to the first number.
Deactivating POS devices
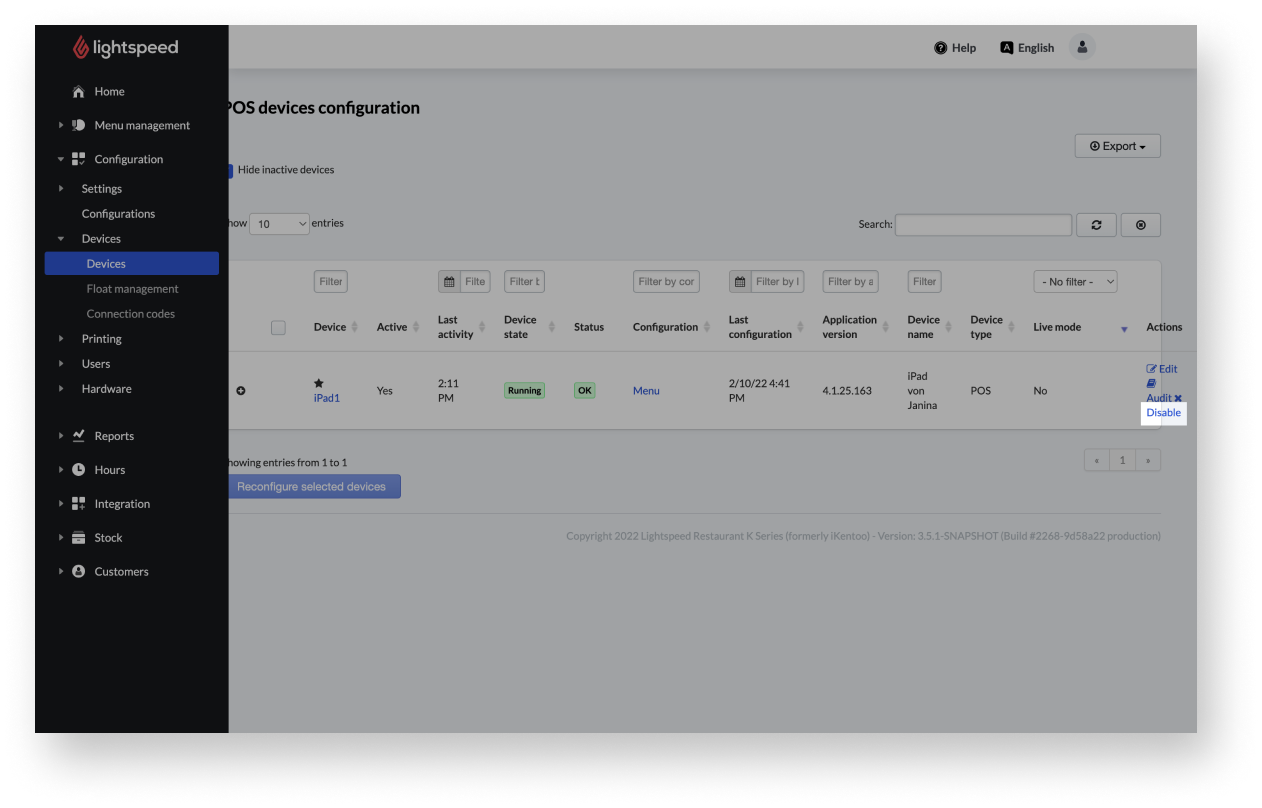
If you ever need to remove a POS device from your system, you may disable it from the POS device configuration table. This won’t permanently remove the POS device, but it deactivated devices are not visible on this page if you select Hide inactive devices. NOTE: If you are disabling a device, this also removes its connection code.
To deactivate a device:
- From the main navigation menu of the Back Office, go to Configuration > Devices > Devices.
- Select Disable.
- Confirm that you wish to deactivate the device.
Auditing devices
If you want to check the basic actions performed on a POS device (such as a POS user opening a sales period or clocking in) you may choose to audit the device. This will display an events log for the selected POS device.
- From the POS device configuration table, select Audit next to the desired device
- An events log for the selected device will open.
Reconfiguring selected devices
If you have made changes in the Back Office that require transferring new data to your POS devices, you may bulk send the changes to a group of devices so their POS device configuration is updated all at the same time.
- From the POS device configuration table, activate the checkbox on the left of the desired devices you wish to update.
- Select the button Reconfigure for POS devices.
- The device configuration will reload for POS devices actively running the Restaurant (K Series) POS app.
Comments
0 comments
Please sign in to leave a comment.